Getting started
Installation
Setting up a Stellify project on your local machine or a server.
You should know!
Installing Stellify locally or on a server is not required when developing your application as you can use the Stellify platform to edit and view your application in your browser.
Forking the Stellify repository
To install the core Stellify (Laravel) framework either on your local machine or on a server you must first fork the repository.
There two reasons this is necessary, firstly you need to add your own database credentials to the environment file and secondly, we may release updates to the underlying application that you need to pull into your fork.
Here are the steps to follow:
-
On GitHub, navigate to the Stellify-Software-Ltd/stellify repository.
-
In the top-right corner of the page, click Fork.
-
Under "Owner," select the dropdown menu and click an owner for the forked repository.
-
By default, forks are named the same as their upstream repositories. Optionally, to further distinguish your fork, in the "Repository name" field, type a name.
-
Optionally, in the "Description" field, type a description of your fork.
-
Optionally, select Copy the DEFAULT branch only.
-
Click Create fork.
Cloning your forked repository (for local development)
Right now, you have a fork of the Stellify repository, but you do not have the files in that repository locally on your computer.
-
On GitHub, navigate to your fork of the Spoon-Knife repository.
-
Above the list of files, click Code.
-
Copy the URL for the repository.
-
To clone the repository using HTTPS, under "HTTPS", click .
-
To clone the repository using an SSH key, including a certificate issued by your organization's SSH certificate authority, click SSH, then click .
-
To clone a repository using GitHub CLI, click GitHub CLI, then click .
-
-
Open Terminal.
-
Change the current working directory to the location where you want the cloned directory.
-
Type
git clone, and then paste the URL you copied earlier. It will look like this, with your GitHub username instead ofYOUR-USERNAME:git clone https://github.com/YOUR-USERNAME/stellify -
Press Enter. Your local clone will be created.
$ git clone https://github.com/YOUR-USERNAME/stellify
> Cloning into `stellify`...
> remote: Counting objects: 10, done.
> remote: Compressing objects: 100% (8/8), done.
> remote: Total 10 (delta 1), reused 10 (delta 1)
> Unpacking objects: 100% (10/10), done.
Configure your database connection
We mentioned earlier, one of the reasons we must fork the Stellify repository is to configure your own database.
To do this, you need to edit the .env file in the root of your forked repository.
DB_CONNECTION=sqlite
DB_DATABASE=/absolute/path/to/database.sqlite
Full instructions on how to connect to and configure your database can be found in Laravel's documentation.
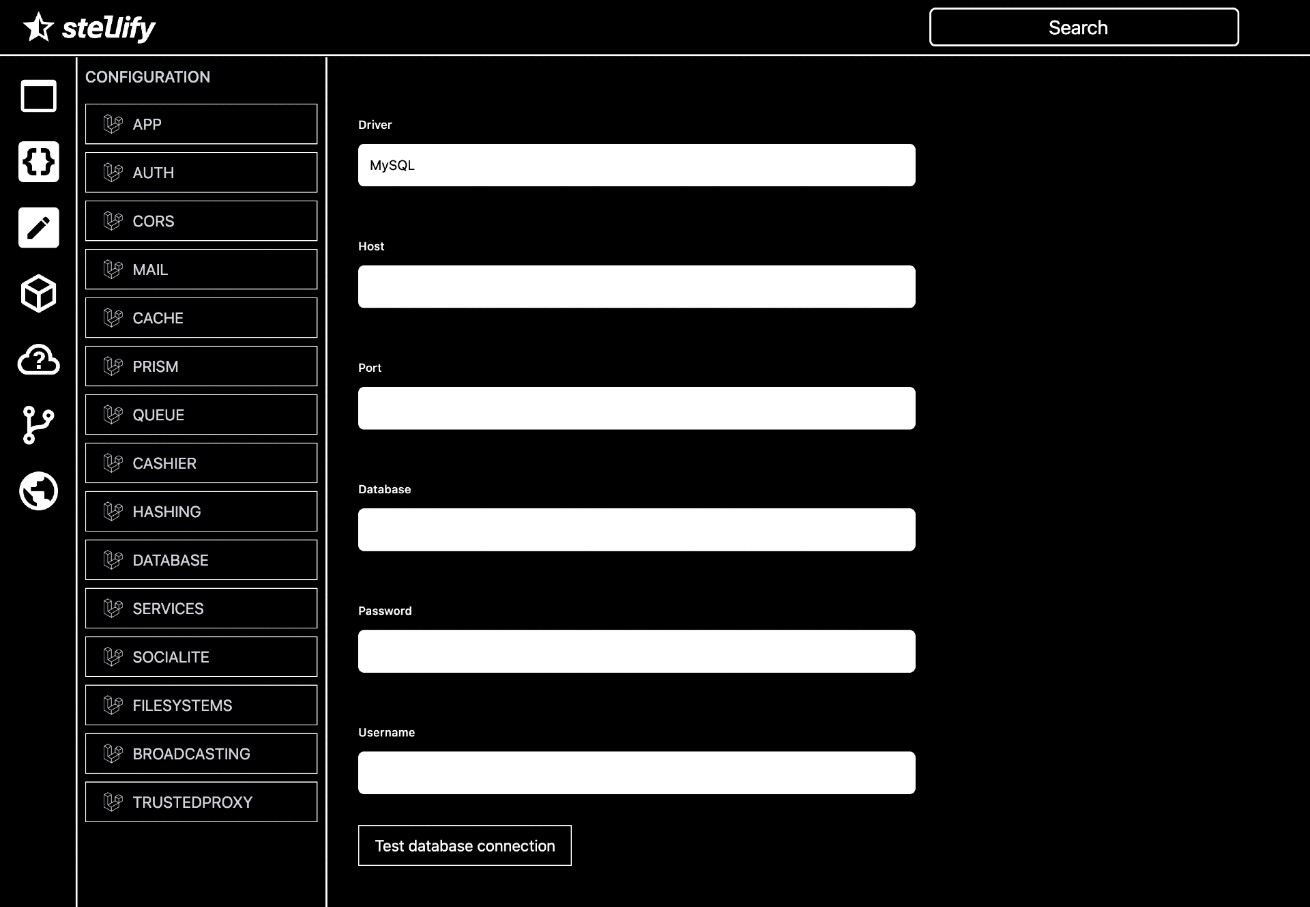
Configure your database connection in the Stellify Editor
You can run migrations from your Stellify project in the Stellify IDE, but you must first configure your database connection.
To do this, navigate to the Configuration Editor screen in the Stellify IDE and enter your database connection details.
Migrate table structure and data
If you simply want to migrate the default table structure, you can run the following command in your terminal:
php artisan migrate
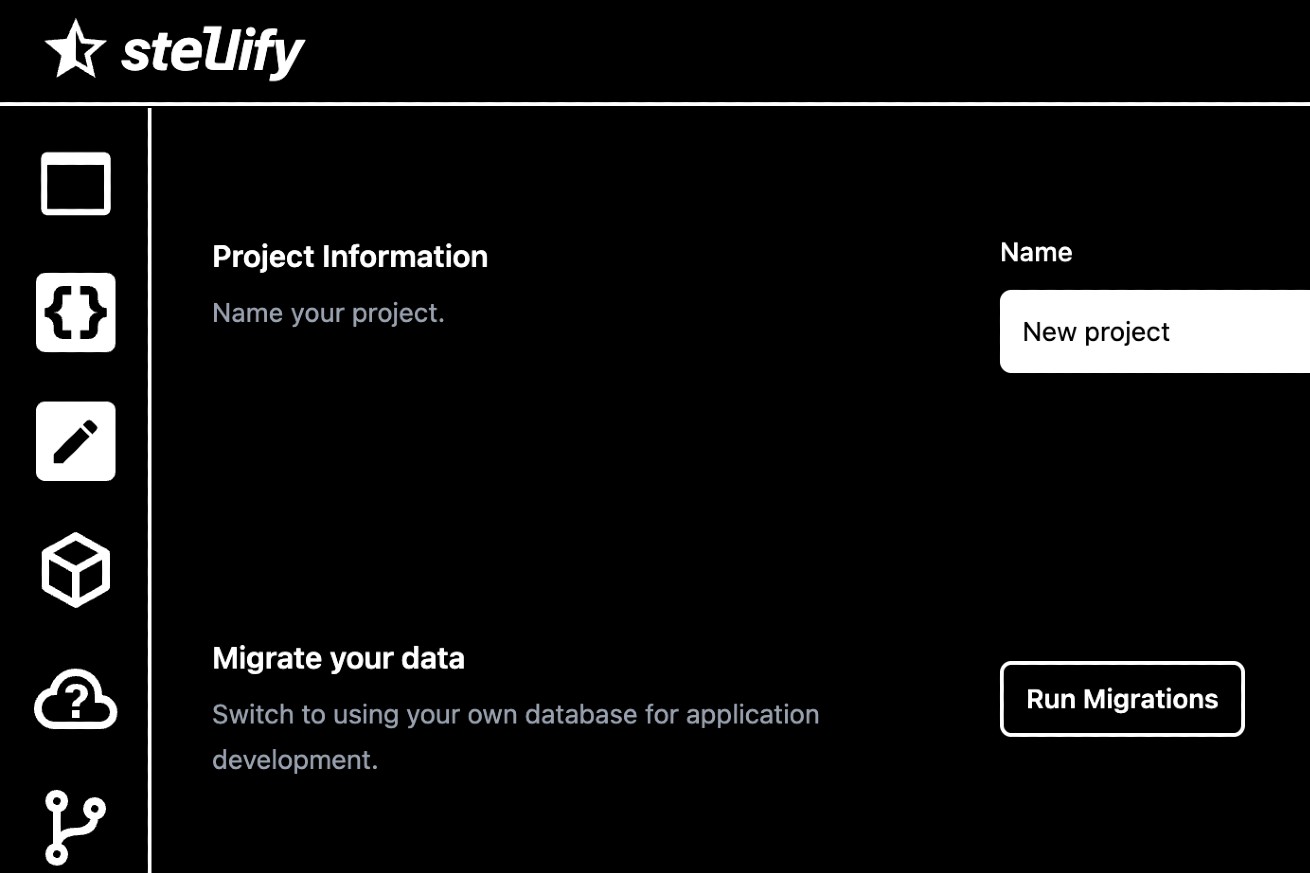
Alternatively, once you have your database connection configured in the Stellify Editor, you can migrate the table structure and data you're using in the Stellify Development Environment. This is achieved by signing into your Stellify account and navigating to the project screen where you'll find a button to trigger the creation of the table structure migration before migrating your data.
Next steps
Once you have your own forked version of Stellify complete with your configuration setup installed locally and you have migrated your data from the Stellify IDE, then you're in a position to deploy your application to a server. On the next page we'll provide some staging and hosting options, along with setup guides.
- Previous
- Development
- Next
- Deployment